How To Clean Skateboard Bearings
Bearings are one of the most important parts of a skateboard and over time as you use a skateboard, dust and dirt can collect in your skateboard’s bearings. It causes the bearings to slow down resulting in slow speed and rusting of the skateboard’s wheels. This can sometimes cause you to lose control of the skateboard and you can end up falling.
The simplest way of cleaning skateboard bearings is to take them off the skateboard, washing in a mild cleaning solution, and immediately dry, them to fix them back on the skateboard.
To ensure that your skateboard’s wheels can move as frictionless as possible, you will need to perform regular maintenance. You can solve minor issues of bearings by applying lubricants on the outside of bearings and then giving them spin. However, if you still feel like the speed of the wheel is slow or is getting stuck, then you may require to clean the bearings.
Pro tips to Clean Skateboard Bearings
Cleaning skateboard bearings is easy and doesn’t require much effort and you can clean them by following these five simple steps:
- Removing wheels.
- Remove bearings and shields.
- Soaking bearings in the cleaning solution.
- Drying and re-lubricating bearings.
- Replace shields and mount bearings.
Sometimes most people confuse that cleaning only wheels with bearings is important, keeping in mind that cleaning wheels are important. However the exact opposite is true, you only need to clean the bearings present inside the wheel. You also don’t have to worry about cleaning longboards as they use the same bearings as normal skateboards so our process of cleaning will work for any type of skateboard.
There are different types of bearings, the most commonly used for skateboards are ones with metal shields and rubber shields. Some also may have no shields, the point is for bearings with metal shields, the cleaning ability will be limited. For rubber or no shields, you can easily clean them by following the 5 steps described below.
Materials you need for skateboard bearing cleaning:
Before we get into how to clean skateboard bearings, you need to have some items that will aid in cleaning skateboard bearings. Here are the items you will need to gather beforehand before starting clean your skateboard’s bearings:
- Skate tool or Wrench.
- Tray or plate to store all hardware.
- Razor Blade/safety pin.
- Cleaning rag or brush.
- Solvent.
- Bowl or cup of solvent.
- Bearing lubricant.
Once you have these items, you can now go into cleaning skateboard bearings by following these simple steps:
Steps To Clean Skateboard Bearings
Removing wheels
The first step is to remove the wheels and you can start by removing the axle nuts using a skate tool or wrench, whatever you have. Slide the wheels off the truck axle and make sure to keep track of washers present in between the axle nuts and inside of the axle and bearings. Most of the time people lose the washers so the best practice is to keep all the hardware or small pieces in a tray. Be sure to carefully put them in a tray as they might fall out while you are sliding the wheels off the truck axle.
Remove bearings and shields
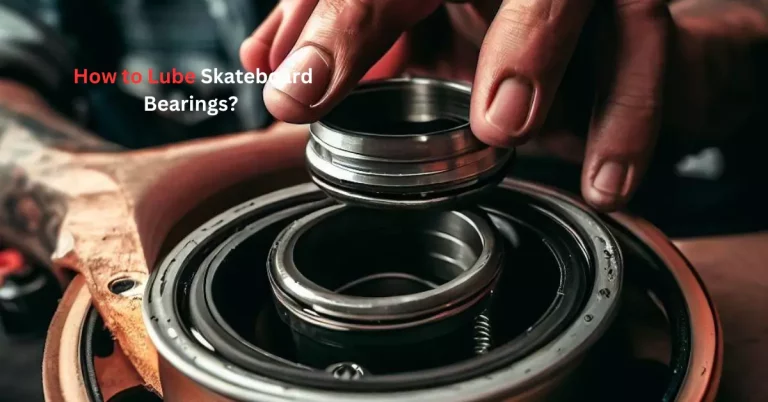
The next step is to remove your bearings from the wheels by opening the bearings using the axle of the truck. For this, you will need to slide the wheel halfway onto the end of the axle so only one bearing is on the axle. When the axle is securely locked and catching the inside of the bearing, you need to twist the wheel outward and around as you try to get the bearings out. Flip the wheel over and repeat the same process.
Once the bearings are out of the wheel, you will need to pop off the bearing shields with a razor blade or a safety pin. Make sure not to bend the shield cover as when you put it back on it will hinder the movement of ball bearings as they will collide against it. Some skateboards, especially long skateboards, use bearing spacers and if your skateboard’s bearings have spacers, be sure not to lose them and keep them in a tray.
Soaking bearings in the cleaning solution
Now you have bearings, you will need a cleaning solution that is not water-based like acetone, isopropyl alcohol, or a bearing cleaning solution found in a local store. Be sure to wear gloves and avoid skin contact with the solvent. The best practice is to use a container, add solvent to it and then dip the bearings in the solvent for several minutes. You can also swirl the bearings inside the solvent for better results. You can get a cleaning kit for cleaning bearings from a local store.
Drying and re-lubricating bearings
Once the sludge has been removed from the bearings, take the bearings out of the solution and dry them as quickly as possible. You can use compressed air, a rug, a hair dryer, or anything, the point is to get rid of all solutions present inside the bearings. You can also tap them down while facing them down to get rid of the solution.
The next step is to lubricate the bearings because dry skateboard bearings end up rusting and generate more friction that may end up damaging them. You can use the lubricant specified for skateboard bearings and drip 2-3 drops of oil into the bearings and spin the bearings to evenly distribute them around the bearings. Some lubricants end up drying quickly so don’t use them.
Replace shields and mount bearings
The last step is to place the bearings back on, that is easier than taking them off. You just need to simply set them in place and gently press them from the center till they snap back on. Just like you remove the spacers if there were any or washers while removing bearings from wheels. You need to put them back on before closing the bearings into the wheels.
Conclusion
In the end, cleaning the bearings gets rid of jerks or slow speeds that you might be getting while you’re riding on a skateboard. You will end up with dirty bearings as the surroundings you ride in aren’t clean and you might ride in rain or mud. The best practice is to clean the bearings once in a while or when you’re feeling the wheels are jerking or when you aren’t getting the same speed as before.

“Welcome to our website, Here You’ll find a wealth of information on finding the right skating gear that will last for years to come, as well as tips and tricks to help you improve your skills. Whether you’re a beginner or an experienced skater, you’ll find something of value here.”